By Kellie Fournier of Sterilite Corporation
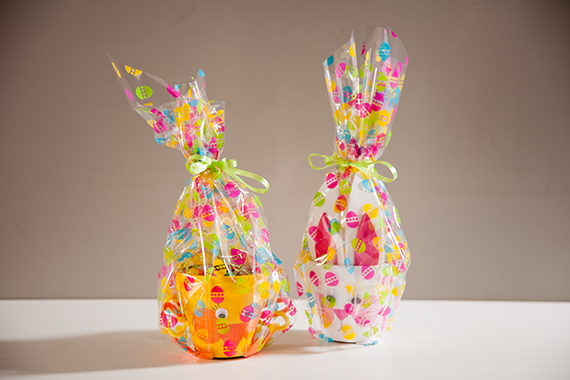
Let me begin with – I don’t consider myself a crafty person! I’m so focused on the outcome to be perfect and for it to look exactly like the original. However, I wanted my boys to work on a fun Easter craft project they would be excited to give to their cousins. We decided to create Easter bunny and chick pots and fill them with Jelly Beans – I’m sure my brother-in-law and sister-in-law will be thrilled with the extra sugar! These Easter pots were adapted from plaidonline.com and were relatively easy to make. Follow the below list of supplies and steps and you can create these adorable pots in just a few hours.
Supplies:
Acrylic Paint – Plaidonline.com recommends Apple Barrel, we used another brand from Michael’s and matched the colors the best I could.
Fuchsia – 2 oz.
White – 2 oz.
Bright Yellow – 2 oz.
Light Pink – 2 oz.
Bright Orange – 2 oz.
Other Supplies:
4” Clay Pots
Foam plate for paints
(2) 1 ¾” foam Spouncer
Scissors
Pencil
Black Fine Tip Sharpie
Lo-temp glue gun
#2 round paintbrush
¾” flat paint brush
23mm wiggle eyes (We used 20mm)
15mm wiggle eyes (We used 14mm)
White craft foam
Pink craft foam
Orange craft foam
Yellow chenille stems (pipe cleaners)
White pompoms
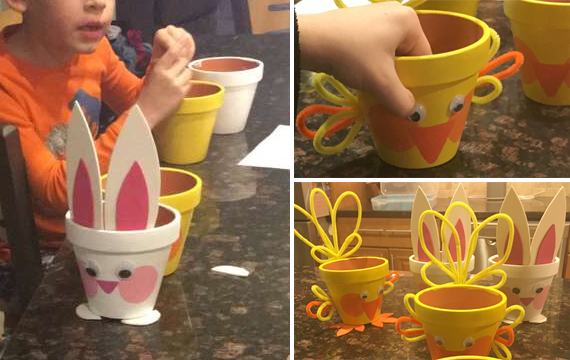
- Basecoat pot with White; let dry. You will need to do a few coats to cover the pot completely – we did 3.
- For cheeks, use 1 3/4” spouncer dipped into Light Pink to make large dots; let dry. Try to go lightly with the paint – the spouncer creates bubbles. Use a small paint brush to smooth.
- Use Fuchsia to paint small inverted triangle for nose; let dry.
- Attach two 23mm or 20mm wiggle eyes.
- Use marker to add mouth details and lines for whiskers.
- Trace and cut two paw and two large ears from white craft foam; cut two small
ears from pink craft foam. Glue a small pink ear over center of each white ear. We created a stencil for the ears so we could easily trace and cut out enough for 3 bunnies. - Refer to photo to glue ears in place inside front rim and paws at lower front.
- For tail, glue white pompom to back of pot near bottom.
- Basecoat pot with Bright Yellow; let dry. You will need to do a few coats to cover the pot completely – we did 3.
- Mix two parts Bright Yellow with one part Bright Orange. Dip 1 ¾” Spouncer into mixture to paint dots for cheeks; let dry. Try to go lightly with the paint – the spouncer creates bubbles. Use a small paint brush to smooth.
- Use Bright Orange to paint large inverted triangle for beak; let dry.
- Attach two 15mm or 14mm wiggle eyes.
- Use marker to draw eyelash lines.
- Trace and cut two feet from orange craft foam. Refer to photo to glue in place on front near bottom edge. We created a stencil for the feet so we could easily trace and cut out enough for 3 chicks.
- For tail feathers, cut two sections with two bumps from chenille stems; cut three sections with three bumps. Bend at centers to form a loop from each piece.
- Overlap three larger loops and twist loose ends together. Place two small loops in front and glue pieces together. Glue ends to rim on back.
- For each wing, cut two sections with two bumps from chenille stems; cut one section with three bumps. Bend at centers to form a loop from each piece. Overlap smaller loops over larger loop and twist ends together. Glue a wing to each side of pot.
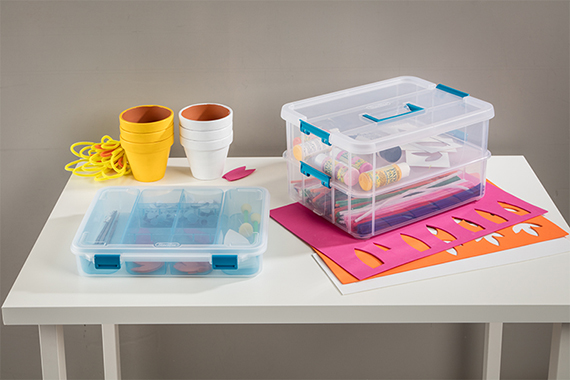
This project took us a few days to complete; we broke this out into multiple steps/days. Day one we painted the pots and set aside, once the pots were completely dry we then added the Cheeks, nose and beak. Day two we made the stencils for the bunny ears, feet and chick feet and cut them out of the craft foam and then made the feathers out of the chenille stems. Day three we decorated the pots with the wiggle eyes, ears, feathers and feet. Day four we filled the pots with decorative grass and jelly beans, wrapped them in clear paper and tied with a bow so no beans would be lost. This helped keep the boys interested in the project from start to finish. During these few days, I stored our supplies in Sterilite’s Divided Case and Stack & Carry 2 Layer Handle Box. The Divided Case was ideal for storing our paint brushes, spouncers, foam brushes, sharpies and wiggle eyes. The 2 Layer Handle Box was perfect for keeping the leftover paint, the stencils we made, and the feathers made out the chenille stems.

Throughout the project, I learned the finished product does not have to be perfect or exact. Stepping away and coming back made me realize the imperfections made these perfect in their own way and we had fun doing it! Take a chance on something that you are not familiar with or think you are not good at – it will only help you grow.
HAPPY CRAFTING & HAPPY EASTER!


This is a great craft to do with my grandkids. They will love it.
Posted by: Retta Brady | 04/05/2017 at 03:18 AM